Pages

Showing posts with label Dessert. Show all posts

Friday, April 17, 2015

Almond Meringues

Every time I make Challah bread I lament the fact that I am throwing 6 egg whites away.  I hate to waste, but egg whites?  What am I going to do with egg whites?  The go to is anything meringue.  The thing is, I just don't love meringue.  As a child my mom would make gorgeous lemon meringue pies and my sister and I would split it.  She'd take the meringue, I'd take the lemony goodness.  But, I really shouldn't waste these egg whites.  And, I should probably have something to show after a day of solitude... OK.  Meringues it is.  Meringues they are?  Hmn.

I found a recipe for more pavlova style meringues and decided to omit the toppings and add some almond extract.  This is from a British recipe, so I am using grams.  It always turns out better than trying to use a conversion.  If you don't have a scale that can do grams and ounces?  Get one.  It's really handy.

Almond Meringues

makes 24 large meringues

Ingredients 

6 Egg Whites, room temperature
1 scant teaspoon almond extract
350 grams Sugar

Instructions

  1. Preheat the oven to 300 degrees.
  2. Prepare 2 baking sheets with parchment paper.
  3. Place egg whites into a large clean bowl.  Add almond extract and beat until they form soft peaks.  Add approximately 1/2 of the sugar and continue to beat. 
  4. Add the remaining sugar one spoonful at a time until all is combined and the mixture forms stiff peaks.
  5. Spoon the meringue onto the prepared baking sheets and bake for 15 minutes.
  6. Reduce the oven temperature to 225 degrees and cook for a further 2-3 hours until crisp and dry.
  7. When they are cooled they can be stored in an air tight container.


Friday, December 26, 2014

Gingerbread Cake


This delightful cake recipe is from the February 2000 issue of gourmet magazine.  This winter I was inspired by this amazing photo (left side, middle) and knew I had to make a ginger cake that would stand up to the beautiful topping.  When Jill brought the cake to a party, I knew I had found my cake.  I should have consulted the picture a little more, because the final result wasn't nearly as pretty.  We can try again next year.  I've made a slight modification of the recipe because, as I discovered, beer and molasses can boil over quickly - got to keep a tight eye on them.  Otherwise this recipe is as posted.

I used a generous portion of Wilton's Cake Release and had no trouble with the bundt pan or the springform (yes, I made two).  I made them 12/23, so that the flavors could meld for Christmas Eve and Christmas Day.  The cake is very tender, yet hearty and rich and it does improve with age.

Ingredients

1 C. Oatmeal Stout or Guinness Stout
1 C. Dark Molasses (not blackstrap)
1/2 tsp. Baking Soda
2 C. All-purpose Flour
1.5 tsp. Baking Powder
2 Tbsp. Ground Ginger
1 tsp. Ground Cinnamon
1/4 tsp. Ground Cloves
1/4 tsp. Grated Nutmeg
Pinch of Ground Cardamom
3 lg. Eggs
1 C. Packed Dark Brown Sugar
1 C. Granulated Sugar
3/4 C Grapeseed Oil
Confectioners sugar for dusting

Accompaniment: Unsweetened whipped cream

Instructions: 

Bring stout and molasses to a boil in a large saucepan watching carefully as it can boil over quickly. Once boiling remove from heat. Whisk in baking soda, then cool to room temperature.

Preheat oven to 350°F. Generously butter bundt pan and dust with flour, knocking out excess.

Sift together flour, baking powder, and spices in a large bowl. Whisk together eggs and sugars. Whisk in oil, then molasses mixture. Add to flour mixture and whisk until just combined.

Pour batter into bundt pan and rap pan sharply on counter to eliminate air bubbles. Bake in middle of oven until a tester comes out with just a few moist crumbs adhering, about 50 minutes. Cool cake in pan on a rack 5 minutes. Turn out onto rack and cool completely.

Serve cake, dusted with confectioners sugar, with whipped cream. Do ahead: This gingerbread is better if made a day ahead. It will keep 3 days, covered, at room temperature.

Friday, August 6, 2010

Marshmallows

It's M week and so we decided to whip up a homemade batch of Ilan's favorite food, courtesy of the Barefoot Contessa. I'm not generally a marshmallow fan, but these sure are good. I would imagine that you could use almond extract or even mint extract (probably in smaller quantities) to give these a different kick. Bobbi even suggested rolling them in cocoa instead of powdered sugar. I don't know if they make Kosher gelatin, but they might.

3 pkg Unflavored Gelatin
1 1/2 C. Granulated Sugar
1 C. Light Corn Syrup
1/4 tsp. Kosher Salt
1 Tbsp. Pure Vanilla
Confectioners' sugar for dusting

Combine the gelatin and 1/2 C. of cold water in the bowl of an electric mixer fitted with the whisk attachment and allow to sit while you make the syrup.

Meanwhile, combine the sugar, corn syrup, salt, and 1/2 C. water in a small saucepan and cook over medium heat until the sugar dissolves. Raise the heat to high and cook until the syrup reaches 240 degrees on a candy thermometer. Remove from heat.

With the mixer on low speed, slowly pour the sugar syrup into the dissolved gelatin. Put the mixer on high speed and whip until the mixture is very thick, about 15 minutes. Add the vanilla and mix thoroughly.

Ilan had to change his shirt after licking the beater.
With a sieve, generously dust and 8x12-inch nonmetal baking dish with confectioners' sugar. Pour the marshmallow mixture into the pan, smooth the top, and dust with more confectioners' sugar. Allow to stand uncovered overnight until it dries out.

Turn the marshmallows onto a board and cut them in squares. dust them with more confectioners' sugar.

Will enjoying a marshmallow.

Friday, July 30, 2010

New York Cheesecake


So I guess I am on a dessert streak lately. Fact is, I cook dinners all the time, but they're not always noteworthy. Anyway, some friends were in town from Israel and we all had dinner at the Davis' and I was bringing dessert. I've been poking around on Smitten Kitchen for something special to make for Scott's Birthday. He just returned from NY and didn't bring me any cheesecake (okay, it's a little hard to do) so when I saw this beauty, I couldn't resist.

This is essentially the recipe from the Smitten Kitchen website, but before I give it to you, I'll share  the changes I've made. First the recipe calls for the cheesecake to bake at 550 degrees for 12 minutes. She fudged with this and had some trouble. Unfortunately, my oven only went to 500. So, I figured I would have to try it at 500. At around 8 minutes, you could tell the outer edge was starting to set, but the top was also browning, so I turned the temperature down to 200 at that point. Luck would have it I still hadn't found a recipe for Scott's birthday and so as I was baking the cheesecake I turned upon a cheesecake recipe from Cook's Ilustrated that said the way to keep a cheesecake from cracking is to make sure the internal temperature doesn't rise above 150 degrees. So, when I checked my cake (using an instant read thermometer) at about an hour and 20, it was in the 130 degree range. I let it go for another 40 minutes or so (remember we're cooking at 200 degrees) until it was just about 150. The center was more than a little wobbly, but it set nicely when it was cooled and was very creamy. Compared to several other recipes I have found where there is a water bath and several other tricks to keep things creamy and un-cracked, this was super easy and the texture was great.
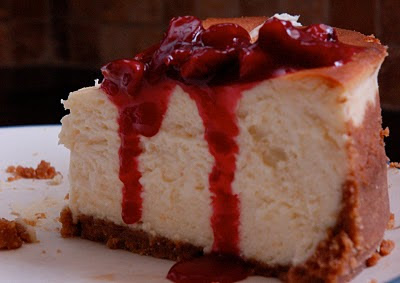
For the topping I used fresh cherries and initially it seemed like it was going to be too thick, but I cooled it with a lid on top and after some refrigeration they loosened.  I've increased the topping to a 1 1/2 recipe because the original recipe was not enough to cover the cake.


Crumb crust
8 ounces (15 4 3/4 x 2 1/2-inch sheets of graham cracker) finely ground graham crackers
8 tablespoons unsalted butter, melted
1/2 cup sugar
1/4 teaspoon salt

filling:
5 (8-ounce) packages cream cheese, softened
1 3/4 cups sugar
3 tablespoons all-purpose flour
1 teaspoon finely grated lemon zest
1 teaspoon finely grated orange zest
5 large eggs
2 large egg yolks
1/2 teaspoon vanilla

Cherry topping
15 ounces cherries, pitted (they’re not in season here so I used frozen; worked just fine)
3 tablespoons lemon juice
1/4 cup plus 2 Tbsp sugar, add more to taste if using sour cherries
1 1/2 tablespoon cornstarch
3/4 cup water

Make crumb crust: Stir together crust ingredients and press onto bottom and up the sides, stopping one inch shy of the top rim, of a buttered 9 1/2-inch (or 24 cm) springform pan. You can fill it right away but I like to pop my into the freezer so it quickly sets while I prepare the filling.

Make very tall cheesecake filling: Preheat oven to 500 degrees. Beat together cream cheese, sugar, flour and zest with an electric mixer until smooth. Add vanilla, then eggs and yolks, one at a time, beating on low speed until each ingredient is incorporated. Scrape bowl down between additions.

Put springform pan with crust in a shallow baking pan (to catch drips). Pour filling into crust (springform pan will be completely full) and bake in baking pan in the middle of the oven for 8-12 minutes or until puffed. Please watch your cake because some ovens will top-brown very quickly and if yours does too fast, turn the oven down as soon as you catch it. Reduce the temperature to 200 degrees and continue baking until cake is about 145 degrees (about 1 1/2 to 2 hours).
Run a knife around the top edge of the cake to loosen it and cool the cake completely in springform on a rack, then chill it, loosely covered, at least 6 hours.

Make cherry topping (optional): Place all ingredients together in a medium saucepan. Bring to a boil. Once it is boiling, cook it for an additional one to two minutes then remove from heat. Cool completely.
Remove side of pan and transfer cake to a plate.
Spread topping over chilled cheesecake.

This cheesecake is best if let to sit out for about an hour before serving.

Cheesecake keeps, covered and chilled, 2 weeks.

Wednesday, July 28, 2010

Banana Cream Pie

So here's the big confession. I can make a great pie, but it's never a pretty sight. I think I lack the quality of perfectionism that might make others agonize over a perfectly shaped pie crust. So, we don't have a picture of the pie, but if you want something super yummy, you've got to try the banana cream pie. This is a recipe my mom made while I was growing up and to me it is pure comfort food. Be sure to use ripe bananas (no green), but not over-ripe either. I actually made this one night for dessert for our picnic at Ravinia Festival and over heard a lady next to us comment to her friend "who makes pies anymore?" in disbelief. Ha ha. I do, and you would too if you knew how yummy this one is.

Banana Cream Pie

Baked pie shell 8" (see recipe below)
1/2 C. Sugar
3 Tbsp. Flour
1 Tbsp. Cornstarch
1/4 tsp. Salt
3 egg yolks, slightly beaten
1 1/2 C. Milk
1 Tbsp. Butter
1 tsp. Vanilla
3 Bananas (I use 4 if they are small)
Whipped cream or cool whip (my family usually uses cool whip, but I know some are opposed)

Slice bananas and cover the bottom of the pie shell.

In a double boiler combine sugar flour cornstarch and salt mix with wooden spoon. Blend in milk and yolks add butter place over rapidly boiling water cook until thick and smooth stirring constantly (about 7 min.) Remove from heat and add vanilla. Stir until smooth.

Pour custard over the bananas and chill.

When ready to serve top with whipped cream or cool whip or whipped cream.


Pie Crust
So, this pie crust is the easy man's pie crust. This was given to my mom by my parent's friend's mom. It's super easy and gives great results. Forget all the complicated pie crust voodoo. This one really is fool proof and super flaky, just don't over mix it.

2 C. Flour
1/2 tsp. Salt
1/2 tsp. Baking powder
1/2 C. Oil
1/4 C. Cold milk

Mix dry ingredients with a fork. Fold in oil and milk until moistened but not completely mixed.

Roll between wax sheets. Turn into in pie plate and shape.

Poke generously with fork over sides and bottom and creases and bake at 350 degrees until golden brown.

Friday, July 23, 2010

Chocolate Pudding

This is an ironic follow-up to my last post. I'm pretty sure Ilan cracked what was apparently a weak molar on the un-popped popcorn kernels that I told him not to eat when we made kettle corn. So, now after he's had his dental work done, poor guy, he has to eat soft foods, so I made him some pudding. This recipe makes 2 good sized servings. Ilan had some after dinner and he said "Ima, this is so yummy I can't believe it!"

1 ounce bittersweet chocolate , chopped
1 tablespoon cocoa , preferably Dutched
2 tablespoons cornstarch
1/4 cup sugar
Pinch table salt
1 1/4 cups whole milk
1 teaspoon vanilla extract

1. Whisk together cocoa powder, cornstarch, sugar, and salt in heavy-bottomed medium saucepan. Add milk all at once and whisk to incorporate. Stir in chocolate.

2. Bring mixture to boil over medium heat, whisking until smooth. Once boiling, reduce heat to low and cook, stirring constantly with heatproof rubber spatula or wooden spoon and making sure to scrape edges of pan, for 2 minutes. (Mixture will become thick and glossy.)

3. Remove pan from heat and stir in vanilla. Pour pudding into heatproof bowls or ramekins, place plastic wrap directly on surface of pudding to prevent skin from forming. Refrigerate for 4 hours or until completely chilled. (Pudding will keep for up to 2 days.)

Sunday, July 11, 2010

Tiramisu

Scott asked me tonight how many servings we have left of the Tiramisu. So far, we have had 2 each, and have shared it with Harrison and Jessica, Ryan and Amanda, and I think there are about 4 more servings. I told him there were at least two more each and he had a pained looked on his face. He wished there was less because he can't resist having it if its in the fridge, but when I offered that we could take some to the neighbors he flatly refused. It's pretty good, but I would reserve this one for a special occasions. It can be pricey: I used 3 tubs of TJ's mascarpone at $2.99 each and three packages of lady fingers at $2.99 each.

2.5 C. Strong Coffee, room temperature
1 1/2 Tbsp. Instant Espresso Granules
9 Tbsp. Dark rum, divided
6 lg. Egg Yolks
2/3 C. Sugar
1/4 tsp. Table Salt
1 1/2 lb. Mascarpone
1/3 plus 3/4 C. Heavy Cream
14 oz. Ladyfingers
Unsweetened Cocoa Powder
Grated Semi-Sweet Chocolate

Stir coffee, espresso and 5 Tbsp. rum in wide bowl or baking dish until espresso dissolves; set aside.

In bowl of stand mixer fitted with whisk attachment, beat yolks at low speed until just combined. Add 1/3 C. cream, sugar and salt and beat at med-high speed until pale yellow. 1 1/2 to 2 minutes, scraping down bowl with rubber spatula once or twice.

Set bowl with yolks over medium saucepan containing 1 inch gently simmering water; cook, constantly scraping along bottom and sides of bowl with heatproof rubber spatula, until mixture coats back of spoon and registers 160 degress on instant-read thermometer, 4-7 minutes. Remove from heat and stir vigorously to cool slightly, then set aside to cool to room temperature, about 15 minutes.

Whisk in remaining 4 Tbsp. rum until combined. Transfer bowl to standing mixer fitted with whisk attachment, add marscapone, and beat at medium speed until no lumps remain, 30-45 seconds. Transfer mixture to large bowl and set aside.

In now-empty mixer bowl (no need to clean bowl), beat cream at medium speed until frothy, 1-1.5 minutes longer. Using ruber spatula, fold one-third of whipped cream into mascarpone mixture to lighten, then gently fold in remaining whipped cream until no white streaks remain. Set mascapone mixture aside.

Working one at a time, drop half of lady-fingers into coffee mixture, roll, remove, and transfer to 13x9-inch glass or ceramic baking dish. (Do not submerge ladyfingers in coffee mixtue; entire process should take no longer than 2-3 seconds for each cookie) Arrange soaked cookies in singel layer in baking dish, breaking or trimming ladyfingers as needed to git neatly into dish.
Spread half of mascarpone mixture over ladyfingers; use rubber spatula to spread mixtue to sides and into corners of dish and smoth surface. Place 2 Tbsp. cocoa in fine-mesh strainer ad dust cocoa over mascarpone.

Thursday, June 24, 2010

Malted Milk Cupcakes

I'm pretty sure this is the recipe Marilee sent me when I needed a good cupcake recipe for Ilan's baseball themed birthday party. When Kay made them for Marilee's shower I thought they were amazing...and asked for the recipe. Turns out I already had it!!

Ingredients
1 box instant chocolate pudding
1 package plain yellow cake mix
1 cup sour cream
1/3 cup vegetable oil
1/4 cup water
4 large eggs
1 teaspoon vanilla
1 cup milk chocolate chips

Bake at 350 degrees for 18-20 minutes.

Place cake mix, pudding mix, sour cream, oil, water, eggs and vanilla in a large mixing bowl. Blend with an electric mixer on low speed for 30 seconds until the ingredients are well blended. Scape down the sides of the bowl and mix on medium and beat for 2 minutes. Fold in the chocolate chips.
Fill the cupcake liners with 1/3 cup of batter into each liner

Malted Milk Buttercream Frosting

1 stick butter room temperature
3-1/2 cup confectioner's sugar
5 tablespoons ovaltine
1/4 cup milk
1 teaspoon vanilla
whoppers

Whip butter, then add confectioners' sugar, malted milk powder,milk, and vanilla. Blend with mixer on low speed. Scrape down sides and mix on medium until fluffy.

Chop malted milk balls and sprinkle onto of frosted cupcakes.

Tuesday, May 18, 2010

Classic Brownies


Another treasure from cook's illustrated. It's a shame I waited so long to try them! Mine took 42 minutes to cook, and I might have taken them out a little early, but Aitan woke up just as the timer went off and duty called...

Classic Brownies
(Cook's Illustrated: March and April 2004)
1 C. Pecans or Walnuts, chopped
1 1/4 C. Cake Flour
1/2 tsp. Salt
3/4 tsp. Baking Powder
6 oz. Unsweetened Chocolate, chopped
12 Tbsp. Unsalted butter
2 1/4 C. Sugar
4 Large Eggs
1 Tbsp. Vanilla Extract

Adjust oven rack to middle position; heat oven to 325 degrees. Cut 18-inch length foil and fold lengthwise to 8-inch width. Fit foil into length of 13x9" baking dish, pushing it into corners and up sides of pan; allow excess to overhang pan edges. Cut 14-inch length foil (and, if using extra-wide foil fold lengthwise to 12-inch width); fit into width of baking pan in same manner, perpendicular to the first sheet. Spray foil-lined pan with nonstick cooking spray.

If using nuts, spread nuts evenly on rimmed baking sheet and toast in oven until fragrant, 5-8 minutes. Set aside to cool.

Whisk to combine flour, salt, and baking powder in medium bowl; set aside.

Melt chocolate and butter in large heatproof bowl in microwave on high for 45 seconds, then stir and heat for 30 second more. Stir again, and, if necessary, repeat in 15-second increments; do not let chocolate burn. When chocolate mixture is completely smooth, remove bowl from saucepan and gradually whisk in sugar. Add eggs one at a time, whisking after each addition until thoroughly combined. Whisk in vanilla. Add flour mixture in three additions, folding with rubber spatula until batter is completely smooth and homogeneous.

Transfer batter to prepared pan; using spatula, spread batter into corners of pan and smooth surface. Sprinkle toasted nuts evenly over batter and bake until toothpick or wooden skewer inserted into center of brownies comes out with a few moist crumbs attached, 30-35 minutes. Cool on wire rack to room temp., about 2 hours, then remove brownies from pan by lifting foil overhang. Cut brownies into 2-inch squares and serve. Store leftovers in airtight container at room temperature for up to 3 days.

Monday, December 21, 2009

Sicilian Fig Cookies

Ever since I can remember my dad, aunt and other friends and family gather in early December to make the fig cookies. Usually it is preceded by weeks of my mom suggesting to my dad that he make a 1/2 batch and him stubbornly trudging ahead as planned. The fig cookies aren't something everyone can appreciate, but they seem to be getting better and better each year. The filling is a mixture of dried figs, dates, citron, those other red and green fruit things (whatever they are) that you find in fruit cake, chocolate and other spices. Every year seems to be a new variation based on what is available and what is going through my dad's head at the time.

He usually starts a week or two in advance of cookie day grinding all of the ingredients in a food grinder and letting them sit in the fridge so the flavors can meld. Then on cookie day everyone has their task and the cookies, which would be an enormous job for one, is done in a matter of an hour or two.

I'm not going to bother posting the recipe, but here are some photos of the family at work.


Dad rolling the dough. I apprenticed in the roller position this year.


Franko and Aunt Toni.

Joe. Franko would fill the dough and Toni and Joe would seal it and cut it.


Cookies ready for the oven.


Nana and Ilan dancing while the cookies bake.


Nina icing and sprinkling the warm cookies.


The finished product.

Thursday, April 2, 2009

Perfect Chocolate Chip Cookies

When I saw the recipe for Perfect Chocolate Chip Cookies in the latest issue of Cook's Illustrated I wasn't too interested. My aunt makes pretty good chocolate chip cookies and it was hard for me to imagine a better recipe that was equally simple. As I read the article I was intrigued by their description of toffee flavors in the cookies. When the ladies from MOPS came over for an after-the-kids-go-to-bed cup of coffee, I thought it would be a good opportunity to try this "perfect" cookie recipe.

I must admit that I didn't follow the instructions exactly. I have a tendency to get ahead of myself and assume what the step is before reading...so I browned all of the butter instead of most of it. I think it probably sent the toffee notes over the top, but my "tasters" (em, Erin and Kirsten) seemed pleased none the less and said that the cookies seemed too good to be made at home.

I tried using stoneware and think the result was better on the parchment lined baking sheets. My first batch came out puffy and thick, which I don't like in chocolate chip cookies, so I flattened the dough a little bit for the next couple of batches which resulted in a flatter cookie. These are big, bakery-style cookies, so the recipe doesn't make too many.

Perfect Chocolate Chip Cookies
Cook's Illustrated Magazine, No. 98; May & June 2009
Makes 16 cookies

1 3/4 C. All-purpose flour
1/2 tsp. Baking Powder
14 Tbsp (1 3/4 stick) Unsalted Butter
1/2 C. Granulated Sugar
3/4 C. Packed Dark Brown Sugar
1 tsp. Salt
2 tsp. Pure Vanilla Extract
1 lg Egg
1 lg. Egg Yolk
1 1/4 Semisweet chocolate chips (preferably Ghirardeli)
3/4 C. Chopped pecans or walnuts, toasted (optional)

Adjust oven rack to middle position and heat oven to 375 Degrees. Line 2 lg. baking sheets with parchment paper. Whisk flour and bakind soda together in med. bowl; set aside.

Heat 10 Tbsp. butter in 10-inch skillet over med-high heat until melted, about 2 m inutes. Continue cooking, swirling pan constantly until butter is dark golden brown and has nutty aroma, 1-3 minutes. Remove skillet from heat and using heatproof spatula, transfer browned butter to large heat proof bowl. Stir remaining 4 Tbsp. butter into hot butter until completely melted.


Add both sugars, salt and vanilla to bowl with butter and whisk until fully incorporated. Add egg and yolk and whisk until mixture is smooth with no sugar lumps remaining, about 30 seconds. Let mixture stand 3 minutes, then whisk for 30 seconds. Repeat process of resting and whisking 2 more times until mixture is thick, smooth and shiny. Using rubber spatula or wooden spoon, stir in flour mixture until just combined, about 1 minute. Stir in chocolate chips and nuts (if using), giving dough final stir to ensure no flour pockets remain.

Divide dough into 16 portions, each about 3 Tbsp. (or use #24 cookie scoop). Arrange 2 inches apart on prepared baking sheets, 8 dough balls per sheet. (Smaller baking sheets can be used but will require 3 batches).


Bake cookies 1 tray at a time until cookies are golden brown and still puffy, and edges have begun to set but centers are still soft, 10-14 minutes, rotating baking sheet halfway through baking. Transfer baking sheet to wire rack; cool cookies completely before serving.

Monday, March 9, 2009

Oznei Haman


In the US these cookies are called Hamentashen (Haman's pockets); in Israel they are Oznei Haman (Haman's Ears). Whatever you call them, these labor-intensive treats are served up at Purim, the feast celebrating God's goodness and the heroism of Esther. Typical flavors include strawberry, apricot, poppyseed and prune, however last year while in Israel we discovered a whole host of middle-eastern flavors that we prefer to the American kind. So, this year I made them with Halvah, Chocolate and the old stand-by Poppyseed. The cookie recipe is good, but it isn't my favorite. Since all my recipe books are in storage I had to make do.

I made a double recipe, which used most of 1 can poppyseed filling (available at Ralphs or any store with a nice Jewish section), almost a whole small tub of nutella, and for the halvah I mixed 1/2 C. Tehina with a little over 1/3 C. honey.

Hamantashen Recipe
By Joan Nathan (Jewish Holiday Kitchen)
Makes about 36

2/3 cup pareve margarine or butter
1/2 cup sugar
1 egg
1 teaspoon vanilla (I use more)
2 1/2-3 cups sifted unbleached all-purpose flour
1 teaspoon baking powder
Dash of salt

1. Cream the shortening with sugar. Add egg and continue creaming until smooth.

2. Add the vanilla. Stir in the sifted flour, baking powder, and salt until a ball of dough is formed (a food processor is excellent for this). You may need to add a couple teaspoons of water if dough seems too crumbly.

3. Chill for 2-3 hours, or overnight.

4. Preheat oven to 375 degrees

5. Taking 1/4 of the dough at a time (leaving the rest in the fridge), roll out on a lightly floured board to a thickness of 1/8 inch. Cut circles of dough with a drinking glass or round cookie-cutter. With your finger put water around the rim of the circle. Fill with 1 teaspoon filling and fold into three-cornered cookies. (Press two sides together, and then fold the third side over and press the ends together.)

6. Bake on a well-greased cookie sheet 10-16 minutes, until the tops are golden.

FYI: the dough can get quite crumbly; if it's too hard to work with, add a bit of water, and it should behave. Also, DON'T skip the step of putting water around the edge of the circle. It's the only thing that makes them keep their shape. Enjoy!

Monday, February 9, 2009

Lemon Squares


The Meyer Lemon is truly one of the world's lost secrets. All the lemony tastes from my childhood are centered on the sweet and tangy fruit of the Meyer Lemon tree in my parents' front yard. Lemonade stands, pies and the unforgettable lemon bar. In my 8 years away from home I have never tasted a lemon bar or lemonade as sweet and tangy as those from Meyer lemon. They are in season and I finally satisfied my eight-year longing for Lemon Bars...the kind that reach back to the sides of your mouth and tickle your senses with their tartness.

Crust:
3/4 C. Butter
1 1/2 C. flour
1/2 C. Powdered sugar


Topping:
3 eggs slightly beaten
2 Tbsp. Flour
1 1/2 C. Sugar
Juice from 1 lg Meyer lemon (2 small)

Preheat oven to 350. Grease 9x12 baking dish.
Mix crust ingredients and press into bottom of the pan. Bake for 20-25 minutes or until crust is golden.
Meanwhile mix egg, lemon juice and sugar. Pour over hot crust and bake an additional 20 minutes or until set. Cool completely
Cut into squares and sprinkle with powdered sugar.

Monday, November 10, 2008

Oreo Truffles

While we were living in Dallas working with CARES each team was to bring treats into the leasing office once a month. Erin made a big hit when she brought these into the leasing office (that further obligated her to be truffle maker extraordinaire for the next couple of years). These little treats are, in theory, quite disgusting. But once you take a bite you forget the ingredients and give way to the chocolately goodness. Only make these if you want to impress folks and be obligated to make more.


1 lb Oreo Cookies
8 oz Cream Cheese
1/2 to 1 tsp. Extract (vanilla, almond, mint or whatever sounds good to you)
1 lb. Milk or Semi-Sweet Chocolate (after experimenting I prefer to use the Wilton baking chips)
1/2 lb. White Chocolate (see note above)
Food coloring if you would like your drizzle to be colored

Using a food processor, grind cookies to a fine powder. With a mixer, blend cookie powder, cream cheese and vanilla extract until thoroughly mixed (there should be no white traces of cream cheese).

Roll into small balls and place on wax-lined cookie sheet. Refrigerate for 45 minutes.

Line two cookie sheets with wax paper. In double-boiler, melt milk chocolate. Dip balls and coat thoroughly.With slotted spoon, lift balls out of chocolate and let excess chocolate drip off. Place on wax-paper-lined cookie sheet.

In separate double boiler, melt white chocolate and food coloring if you are using it. Using a fork, drizzle white chocolate over balls (I prefer to use a plastic squeeze bottle that you can find in the cake decorating section of Michaels). Let cool.

Store in airtight container, in refrigerator.

Friday, July 25, 2008

Why didn't we find this place earlier

You may read in all of the tour books and magazines about the famous Abu Shukri Hummus in the old city of Jerusalem, or Abu Ghosh, but the truth is that the hummus you find in the north far exceeds all others. Whether it be Hummus Said in Acco or Abu Adam in Kfar Yasif, it is simply better. Another gem we recently discovered in Kfar Yasif is a little bakery. On a few occassions we have had baklava here made with peanuts. I suppose if you are a big peanut butter and honey fan (Nina) this may appeal to you, but I prefer the salty goodness of pistachio...that is I did until we found this place. The pistachio baklava is great, as is the Kanafe, but the peanut baklava has stolen my affection. They grind the peanuts so that it is almost the consistency of peanut butter - good, natural, chunky peanut butter. Salty. Sweet. Amazing.

So much anticipation...can you stand it?


Kanafe. I'm not really sure what it is, but Scott loves it. I'll safe my calories for the nut filled treats.


And, finally, the baklava in a variety of shapes and sizes.


It is by far the best baklava we've had in Israel... and anywhere else for that matter.